I´ve been asked how I folded the simple one-sheet sketchbook I used during December, and thought I´d write a simple how-to. You´ll have to excuse the quality of the photos, the light conditions weren´t the best when I did this…
I have seen this method on the internet before, I think one description was in a YouTube movie and one on a homepage, but I can´t find any of them. If I knew who did it, or who invented this sketchbook type, I would gladly give credit here, but I don´t know. Still, thanks, whoever it was. It is a very useful little thing.
I hope the images show most of what you need to do, since writing an instruction like this is really putting my English to the test. This should be interesting…
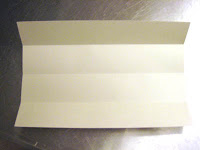
First, pull out a big sheet of your favorite drawing paper. This instruction is made with an A4 cartridge paper, but of course you want a Bigger and Better sketchbook than that.
Fold it in the middle, lengthwise, and then fold each half in the middle as well.
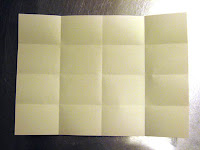
Turn the paper 90 degrees, and then do what you did in the first step – fold in half, and then fold each half in the middle. Now you should have the folding lines ready to start cutting.
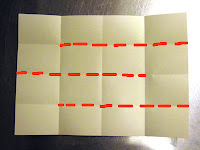
If you want landscape format on your sketchbook, cut according to these red lines. Please cut along a ruler, the sketchbook will look better the more accurately you do this.

If you want portrait format, cut this way instead.

Start at one of the loose ends and fold the paper accordion style to the other end.
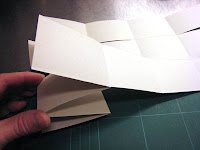
Then fold this little “pile” in under the next strip, as the image shows.

Keep folding the next strip accordion style too.
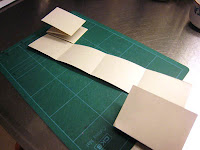
Then start from the other loose end, and do the exact same moves as in the previous three steps.

You should end up with two piles of accordion folded paper, hinged together at the bottom.

When you pick the pile up, it should look something like this.

Fold the two piles together, as in the picture. Now your sketchbook is finished. If you want to, you can fold a cover to stick it into, to make it a bit sturdier and keep it together.
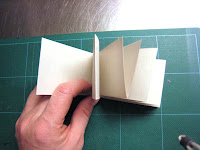
You´ll note that almost the whole book is accordion style folded, except for two pages that are open in the front end. I guess you could put some glue here, but I never do. If you glue, you will not be able to unfold the book completely afterwards.
As I said in December, I think this would be a great way to bring some good quality watercolour paper on a journey, for example. It would probably be hard to fold a paper that´s too thick, though, but 300 gsm or less should be ok. Since all drawings/paintings end up on the same side of the original big sheet of paper (unless you draw on the outside of the first and last pages) it is easy to cut out single paintings that you want to frame or sell or give away or whatever.
1 Comment
Very portable and compacted and easy to do.